Generate custom images using Stable Diffusion with LoRA
Introduction
Stable Diffusion is a very powerful generative model. It can generate high quality images from text descriptions. But if you want to generate images with concepts not included in the pre trained model, like a portrait of yourself, you need to fine tune the model with your own images.
LoRA: Low-Rank Adaptation of Large Language Models is a method to fine tune large language models with small datasets, it can also be applied to Stable Diffusion fine-tuning.
There are other methods like DreamBooth, but the biggest advantage of LoRA is that it’s very easy to train and use, the result model is also very small (a few MB), make it very suitable for sharing.
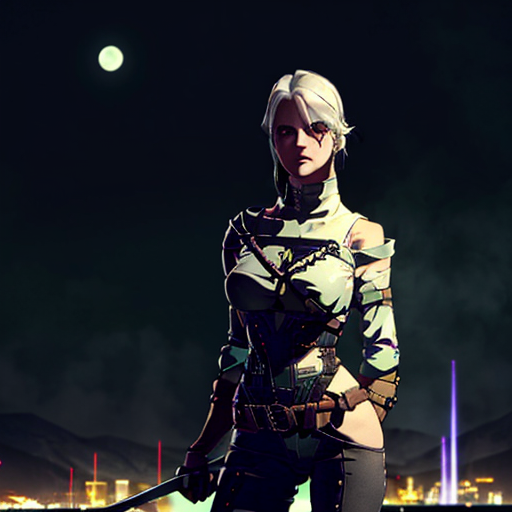
In this post, I will show you how to fine tune Stable Diffusion with LoRA, and generate a image of how Ciri from The Witcher 3 looks like in Cyberpunk 2077.
Tools and Tasks
Since the original Stable Diffusino model doesn’t know Ciri nor Cyberpunk style, or it has been trained on them but not the way we want, we need to teach it our concept of Ciri and Cyberpunk style.
The tools we need are:
- sd-scripts for training LoRA model
- Stable Diffusion web UI for generating images
The tasks are:
- Fine tune a LoRA model with Ciri images
- Find a shared LoRA model of Cyberpunk style
- Generate a image of Ciri in Cyberpunk style
Prepare
-
Setup
condaenv, one forsd-scripts, another one forstable-diffusion-webui -
Setup sd-scripts, Linux setup is not included in README, can be done like this:
 # https://pytorch.org/get-started/previous-versions/#linux-and-windows-2
 conda install pytorch==1.13.1 torchvision==0.14.1 torchaudio==0.13.1 pytorch-cuda=11.7 -c pytorch -c nvidia

 pip install --upgrade -r requirements.txt

 # https://github.com/facebookresearch/xformers#installing-xformers
 conda install xformers -c xformers

 accelerate config
Note if you are using newer cuda version, you may need to bump
bitsandbytesversion to latest, see this PR. -
Setup Stable Diffusion web UI, follow wiki.
-
Download pre trained base models, the most popular one is SD1.5, but since we are making gaming images, AnyLoRA is a more suitable one. Put them in
models/Stable-diffusionunderstable-diffusion-webuifolder. -
Download Ciri images from wiki
-
Pre-process Ciri images, crop them to 512 pixels as the shorter side, png format.
Fine-tune
The whole process is powered by sd-scripts, you may find English translated document here.
-
Set current conda env to be
sd-scriptsone, e.g.conda activate sd-scripts -
Put all Ciri images in a folder, optionally with a text file for each image, containing the description of the image, e.g.
ciri_w3 sword -
Prepare a config file for dataset,
dataset_config.toml:[general] enable_bucket = true shuffle_caption = true caption_extension = '.txt' keep_tokens = 2 [[datasets]] resolution = 512 batch_size = 4 [[datasets.subsets]] image_dir = 'PATH_TO_CIRI_IMAGES' class_tokens = 'ciri_w3' -
Prepare a text file for sample prompts,
sample_prompts.txt:ciri_w3 -
Prepare a config file for training,
train_config.toml:cache_latents = true clip_skip = 2 dataset_config = "PATH_TO_DATASET_CONFIG_TOML_ABOVE" gradient_checkpointing = true learning_rate = 1e-4 logging_dir = "PATH_TO_LOGGING_DIR" max_train_epochs = 200 mixed_precision = "fp16" network_module = "networks.lora" optimizer_type = "AdamW8bit" output_dir = "PATH_TO_MODEL_OUTPUT_DIR" output_name = "ciri_w3_anylora" pretrained_model_name_or_path = "PATH_TO_ANYLORA_MODEL_UNDER_STABLE_DIFFUSION_WEBUI" prior_loss_weight = 1.0 sample_every_n_epochs = 10 sample_prompts = "PATH_TO_SAMPLE_PROMPTS_TXT_ABOVE" sample_sampler = "ddim" save_every_n_epochs = 10 save_model_as = "safetensors" xformers = true -
Start training under
sd-scriptsdir:accelerate launch --num_cpu_threads_per_process 1 train_network.py --config_file="PATH_TO_TRAIN_CONFIG_TOML_ABOVE" -
During training, can inspect sample images under output dir
-
After training, the final model will be under output dir,
ciri_w3_anylora.safetensors, copy it tomodels/Loraunderstable-diffusion-webuifolder
Find shared model
There are many shared models in civitai or Hugging Face, luckly we can find one for Cyberpunk style, Cyberpunk Edgerunners (Studio Trigger) Style LoRA.
Download the model and put it in models/Lora under stable-diffusion-webui folder.
Generate image
Now that we have a fine tuned model for Ciri and a shared model for Cyberpunk style, we can generate a image of Ciri in Cyberpunk style.
-
Start web ui under
stable-diffusion-webuidir:./webui.sh --xformers -
Visit http://127.0.0.1:7860/
-
Select
anyloramodel asStable Diffusion checkpoint -
Find some example prompts from shared model, like this one looks like Lucy
-
Adjust prompt to suit our need
cyberpunk edgerunners, (ciri_w3), bare shoulders, leotard, looking at viewer, off-shoulder jacket, off shoulder, sleeveless turtleneck leotard, solo, turtleneck leotard, night city, holding a katana, moon in background, ((masterpiece)) <lora:cyberpunk_edgerunners_offset:1> <lora:ciri_w3_anylora:0.7> -
Negative prompt
(painting by bad-artist-anime:0.9), (painting by bad-artist:0.9), watermark, text, error, blurry, jpeg artifacts, cropped, worst quality, low quality, normal quality, jpeg artifacts, signature, watermark, username, artist name, (worst quality, low quality:1.4), bad anatomy -
Sampling method
DPM++ 2M SDE Karras -
Sampling steps: 30
-
Generate!
-
Play with different prompts and settings to get different results.
Conclusion
The potential of Stable Diffusion with LoRA is huge, it can be used to learn new concepts, and combine them to create new art. Want to get a portrait of yourself in a specific style? Just fine tune a model with your selfie photos, and another model with the style you want, then combine them together to generate the portrait. The only limitation is your imagination.